Saturday, March 7, 2009

ChiliFest 2009

Thank you everyone who came to our First Annual Chili Fest! Sorry the post is two weeks late; thanks for your patience. Chili Fest was a raging success. We had six chilis - three vegetarian and three meat - plus cornbread, desserts, beer, and wine. The thirty or so people we packed into our tiny apartment voted on a veggie and meat chili winner, but everyone agreed every dish was delicious.

Here's the insane chili paste I made with a combo of hot hot dried and fresh peppers. My fingers were burning for days.

All the accoutrements: chili paste, chopped hot peppers, red and green sweet peppers, avacado, sour cream, cheese, lime, and adobo.

Peter's Team ATM killer Lucha Libre meat chili.

Some of the veggie chilis (including a family recipe and Keegan's winning chili).

My meat chili - secret ingredients included dark beer and chocolate.

And don't forget the desserts! Lindsay made heavenly mini chocolate cupcakes with peanut butter icing.
And Vicky made the best carrot cake with cream cheese frosting I've ever eaten. This picture does not do it justice.

Excuse the poor and missing pictures - I was so busy eating, I practically forgot to document the night! Again, thanks everyone for coming; this will definitely be an annual event. I heard lots of discussion about possible future food-centered activities. Can't wait. Bake-off, anyone?

Highlights from the Past Few Weeks

Since I'm so behind, rather than bore everyone with whole posts about every meal I've made in the past few weeks, here are the highlights!

I love rice and beans. They're cheap, healthy, and packed with goodness. And, there are plenty of ways to dress them up. Rather than go my normal Mexican route here, I added some Indian spices for an almost Biryani rice and beans. Cook jasmine rice. Cook onions and garlic with your favorite selection of beans and add spices like curry powder, cumin, chili powder, etc. I also added mixed raisins and almonds, and had mango chutney on the side. Delish.

I barely even remember what I put in this salad. There was lettuce, grilled chicken, roasted beets, candied pecans, and parmesan cheese. And maybe pears. It had a lot going on, but tasted great.


Our favorite Italian restaurant, Sapore, is long gone, but I often miss their simply done pasta dishes. Here I tried to recreate one by making a spinach pesto and mixing it with ricotta.


A few years ago Evan and I took a cooking class at the Institute of Culinary Education. It was awesome, and one of the recipes that I was surprised to love and use often was for bread pudding. It's an incredible use for slightly stale bread - it turns it into a delectable dessert!


Almond Bread Pudding with Warm Bourbon Sauce
Adapted from ICE

Ingredients
Bread Pudding:
2 eggs 3/4 cup sugar
3 cups milk
1 cup heavy cream
1/2 cup (1 stick) butter, melted
2 teaspoons vanilla extract
1 teaspoon almond extract (I didn't have so just used extra tsp vanilla)
1/2 cup currants (I left this out)
1/2 cup slivered almonds, toasted
1 teaspoon freshly grated nutmeg
8 ounces stale French bread, sliced 1/2 inch thick (any loaf of bread will work, I used a baguette)

Warm Bourbon Sauce:
1 cup sugar
1/4 cup (1/2 stick) butter
3 tablespoons half and half
1 egg yolk
1/4 cup bourbon

Method
For the Bread Pudding:

In a bowl combine the eggs, sugar, milk, cream, butter, vanilla and almond extracts, currants, almonds, and nutmeg. Whisk to blend well. Put the bread slices in a large bowl and pour the egg mixture on top. Let stand, turning the bread as necessary, until the bread is soft and saturated with the custard mixture, about 30 minutes. Arrange the bread slices in 2 layers (I only did 1 layer) in a lightly greased 8-inch square or round baking dish and pour any unabsorbed custard mixture over the top of the bread. Cover and refrigerate for at least 1 hour, up to 2 hours. Preheat the oven to 350F. Bake the bread pudding until the custard is set and the top is lightly browned, about 45 minutes to 1 hour.

For the Warm Bourbon Sauce:
Combine the sugar, butter, and half and half in a medium saucepan over lw heat and cook, stirring frequently, until the sugar dissolves. Remove from the heat. In a smal bowl, stir 1/4 cup of the hot sauce with the egg yolk until well blended (this tempers the egg so you don't scramble it). Pour the mixture back in the pan with the remaining sauce, stirring constantly over medium-low heat. Remove from heat. Cool for about 5 minutes then stir in the bourbon to taste.

To Serve:
Place a piece of bread pudding on a plate and drizzle with the warm bourbon sauce. Whipped cream would be a nice substitute or addition as well.

Brie, Kale, and Mushroom Omelet

As has been the pattern lately, I haven't had time to post entries in a timely manner. But better late than never! I made this omelet quite a few Sunday ago at this point, but it was super tasty and worth mentioning.

Saute the kale (I used lacinato) and mushrooms until wilted (don't overcook).

Beat 4 to 5 eggs together and pour into a nonstick skillet over medium-low heat. Once the eggs start to cook put the brie, followed by the cooked vegetables, over half of the eggs.

When the eggs are set, flip half over the vegetables.

Cook for another few minutes until the middle is set. Cut in half and serve on a plate with the remaining sauteed vegetables.

Sunday, March 1, 2009

Recipes to Rival: Fresh Ricotta

This month's Recipes to Rival Challenge was brought to us by laurendc of I'll eat you. The challenge: to make fresh ricotta, and then to make something delicious with that fresh ricotta! A recent Bon Appetit featured homemade ricotta and I was meaning to try it - this presented the perfect opportunity. And you know what - it's so easy! This is definitely something I'll be doing from now on. I made half the recipe provided and it tok about an hour, but with very little labor.

INGREDIENTS:
1/2 gallon milk
1 pint buttermilk

METHOD:
Place buttermilk and milk in a pot, heat on med-low heat until it reaches 185 degrees.

It will begin to separate into curds and whey. Be sure to stir occasionally to make sure no curds stick to the bottom and burn. You will see that as the temperature approaches 185, the whey becomes clearer as the curds coagulate more.

Pour the curds into a cheesecloth lined collander. Tie the ends of the chesecloth together and hang for 10-15 minutes. I was out of cheesecloth so transferred curds from pot to a paper towel-lined colander. Allow to strain for about 15 minutes. Remove from the cheesecloth and place in an airtight container.

Some tips:

You can use milk that has been pasteurized, but not ultra-pasteurized. Ultra pasteurization heats the milk too much, and de natures the proteins that form curds. You will not get cheese from ultra pasteurized milk. Sorry.

Make sure your pots and other equiptment are very clean before starting

You can make any amount as long as you stick to a 4 parts milk to 1 part buttermilk ratio.


To use my ricotta I made one of my favorite, yet most simple ricotta dishes - a crostini with ricotta and honey. Simply toast some bread and spoon on ricotta and honey. Fresh and delicious.

Daring Bakers February Challenge: Flourless Chocolate Cake

The February 2009 challenge is hosted by Wendy of WMPE's blog and Dharm of Dad ~ Baker & Chef. We have chosen a Chocolate Valentino cake by Chef Wan; a Vanilla Ice Cream recipe from Dharm and a Vanilla Ice Cream recipe from Wendy as the challenge.

This month's Daring Bakers Challenge was a flourless chocolate cake. It was far easier than any chocolate cake recipe I have made, and resulted in a rich, decadent dessert. I baked mine in ramekins, which produced perfectly portioned mini chocolate cakes. I brought them to a dinner party last night along with fresh whipped cream and strawberries.

Chocolate Valentino
Preparation Time: 20 minutes


INGREDIENTS:
16 ounces (1 pound) (454 grams) of semisweet chocolate, roughly chopped (I used 10 ounces bittersweet and 6 ounces semisweet - delicious!)
½ cup (1 stick) plus 2 tablespoons (146 grams total) of unsalted butter
5 large eggs

METHOD:
1. Put the chocolate and butter in a heatproof bowl and set over a pan of simmering water (the bottom of the bowl should not touch the water) and melt, stirring often. (I melted the chocolate and butter separately in the microwave and mixed them together. Worked perfectly).
2. While your chocolate butter mixture is cooling. Butter your pan and line with a parchment circle then butter the parchment.
3. Separate the egg yolks from the egg whites and put into two medium/large bowls.
4. Whip the egg whites in a medium/large grease free bowl until stiff peaks are formed (do not over-whip or the cake will be dry).
5. With the same beater beat the egg yolks together.
6. Add the egg yolks to the cooled chocolate.


7. Fold in 1/3 of the egg whites into the chocolate mixture and follow with remaining 2/3rds. Fold until no white remains without deflating the batter.


8. Pour batter into prepared pan, the batter should fill the pan 3/4 of the way full, and bake at 375F/190C


9. Bake for 25 minutes until an instant read thermometer reads 140F/60C.
Note – If you do not have an instant read thermometer, the top of the cake will look similar to a brownie and a cake tester will appear wet.
10. Cool cake on a rack for 10 minutes then unmold. Serve with fresh whipped cream and strawberries, or your favorite ice cream. Shown here is mocha ice cream.


Sunday, February 8, 2009

Baked Ziti and Blackened Black Fish

By a fluke of scheduling I didn't have to work Thursday night so I got to cook! Evan had a yen for baked ziti and I was glad to oblige. Keegan and George came over as well, and Keegan brought some black fish, which is a local grouper. When Evan and I were coming home from our honeymoon in Barbados over the summer, we had a layover in Jamaica and we purchased a bunch of spices in the airport. One such spice, pictured below, Keegan won in a poker game. He decided to finally use it (one of the first ingredients, by the way, is MSG).


Keegan had two large fiillets and coated the fish in the cock flavored seasoning.


Then he cooked the fish in a little olive oil until it was blackened on the outside. There were even a few flame-ups...


As our first course, we each had a piece of blackened black fish with a salad. The fish was tender and delicious. The seasoning was powerful and terrifically savory.


In the meantime, I made garlic bread. Simply slice a baguette in half, then in half lengthwise. Melt 2 tablespoons of butter and mix in chopped garlic and about 1 tablespoon olive oil. Brush this mixture on the bread, wrap it up in tin foil, and bake in a 350-450 oven for about 10-15 minutes until warm and crispy (in this case I baked it alongside the ziti).


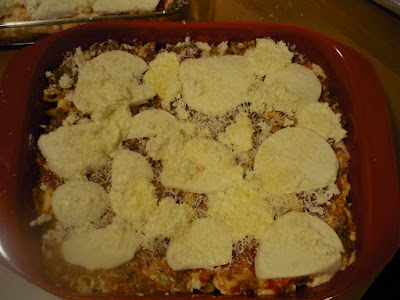
I made two baked zitis - one vegetarian and one with meat. With the exception of the meat, the recipe is the same for the two (which I adapted from Martha Stewart).

Ingredients:
1 pound ziti rigate or penne
2 cans (24-26 ounces) whole peeled tomatoes with juice2 cups part-skim ricotta
2 large eggs, lightly beaten
1 poundlean ground beef
1 1/4 cup grated parmesan
2 pounds shredded fresh mozzerella


Method:
Preheat oven to 450 degrees. Bring a large pot of water to boil and cook pasta until al dente. Put about 1/3 of canned tomatoes in a sauce pot to cook. In a larger saucepan cook the beef, breaking it up, until browned. Add the remaining tomatoes and juice and simmer on low.

In a small bowl, combine ricotta, egg, 1/2 cup Parmesan, and half the mozzarella; season with salt and pepper. Mix the some ziti with each sauce. You should have two baking pans, one large and one small. Spread about half the tomato sauce on the bottom of the pan. Top with ziti, then ricotta mixture and remaining sauce. Sprinkle with remaining parmesan, mozerella, and ricotta mixture.

Bake until the top is slightly browned and the sauce is bubbling, 20 to 25 minutes. Serve and enjoy! The leftovers reheat brilliantly as well.

Friday, February 6, 2009

Slow Cooker Beef Stew

In the winter time I love my slow cooker. It's true. I haven't entered into the realm of making lasagna and cookies using the device. Rather, I appreciate my crockpot for allowing me to slow cook stews and other meat dishes with my busy schedule. I can plug it in in the morning and come home to delicious stew. Perfect.

For this stew I simply threw together cubed stew meat, mushrooms, onions, potatoes, carrots, red wine, beef stock, rosemary, salt, and pepper. I put it on low before I left for work and came home to find tender meat and satisfying flavors.

Because I didn't have time to sear the meat first in the morning, I threw it in a hot pan for a few minutes when I came home. Then I deglazed the pan with a little red wine, added some butter, and drained the liquids from the crock pot into the pan to reduce the sauce. This makes for a thicker, heartier stew.

Return the thickened sauce to the crock pot and mix to combine.

Serve in large bowls and enjoy! Pair with the red wine you cooked with, or a cold dark beer.

Sunday, February 1, 2009

Recipes to Rival - Beet Leaf Holopchi

This month, Katbaro of A Good Appetite and Giz & Psychgrad from Equal Opportunity Kitchen are the hosts of Recipes to Rival. Last month I sadly completed only half of the challenge, but the gougeres were such a success I felt satisfied. This month I was determined to complete the challenge - and with a dish that requires three risings and 5 to 6 hours, this was no easy feat.

This month's challenge is a Ukrainian dish, hearty and comforting for winter, called beet leaf holopchi. I followed the suggestions of another Recipe to Rivaler and quartered the original recipe - I can't even imagine how much that made! As it was, I filled a large baking pan and had enough extra dough to bake a loaf of bread! I also used red chard rather than beet leaves. You can see another posting on this dish here.

Beet Leaf Holopchi

from The Keld Community Ladies Club in Ashville, Manitoba (1976).

Ingredients:
1/4 t sugar
2 T warm water
1 1/8 t instant yeast
1/2 c scalded (or simply heated) milk
1 c warm water
1 T melted butter
2 c flour
2 T beaten egg
1/2 T salt
1 t sugar
1 1/2 c flour plus more as needed

Method:
Dissolve 1 tsp sugar in 1/2 cup tepid water, sprinkle with yeast and let stand for 10 minutes. To the milk-water liquid add the melted butter, dissolved yeast and 2 cups flour.

Let rise in a warm place until doubled in bulk (about 1 hour). Add salt, beaten eggs, sugar and remaining flour; add up to 1/2 cup additional flour until mixture is smooth, not sticky.


Knead well until dough is smooth and top with melted butter or oil. Place in a warm place and let rise until doubled in bulk. It will take about 2 hours. Punch down.

When dough has risen to double in bulk, place a piece of dough, the size of a walnut on a beet leaf and roll up (leaving sides open) Place holopchi loosely in a pot to allow for dough to rise to double in bulk again (about an hour).


Arrange in layers, dotting each layer with butter. Cover tightly, bake in a moderate oven of 350 F for 3/4 to 1 hour. Serve with dill sauce or cream and onion sauce (below). (Katbaro recommends cooking the holopchi with the sauce but you don't have to. You can add it later - just make sure you have enough butter in roasting pan before layering your beet leaf rolls.)

Sauce
Ingredients:
1/2 cup butter
2 cups whipping cream
8 small onions (such as chives)
2 handfuls of chopped fresh dill (this makes the whole dish)
2-4 large cloves of garlic, chopped fine

Melt butter in saucepan. Add onions (chives) garlic, dill and cream. Let it come to a boil and then turn down the heat. Katbaro cooks the holopchi with the sauce but you don't have to. You can add it later - just make sure you have enough butter in roasting pan before layering your beet leaf rolls.

Thursday, January 29, 2009

January Daring Bakers - Tuiles

This month's challenge is brought to us by Karen of Bake My Day and Zorra of 1x umruehren bitte aka Kochtopf. They have chosen Tuiles from The Chocolate Book by Angélique Schmeink and Nougatine and Chocolate Tuiles from Michel Roux.

I've never made tuiles before and was excited to see how simple they seemed. As Karen and Zorra explain: "Traditionally, tuiles are thin, crisp almond cookies that are gently molded over a rolling pin or arched form while they are still warm. Once set, their shape resembles the curved French roofing tiles for which they're named. The Dutch angle: traditionally this batter was used to bake flat round cookies on 31st December, representing the year unfold. On New Years day however, the same batter was used but this day they were presented to well-wishers shaped as cigars and filled with whipped cream, symbolizing the New Year that's about to roll on. And of course the batter is sometimes called tulip-paste."

Our directions were to choose one of three tuile recipes provided, shape it prior and/or after baking, and pair it with something light. They made stunning butterfly shapes as an example, and mine came out nowhere near as elegant.

Following is a recipe taken from a book called “The Chocolate Book”, written by female Dutch Master chef Angélique Schmeinck.

Recipe:
Yields: 20 small butterflies/6 large (butterflies are just an example)
Preparation time: batter 10 minutes, waiting time 30 minutes, baking time: 5-10 minutes per batch

65 grams / ¼ cup / 2.3 ounces softened butter (not melted but soft)
60 grams / ½ cup / 2.1 ounces sifted confectioner’s sugar
1 sachet vanilla sugar (7 grams or substitute with a dash of vanilla extract)
2 large egg whites (slightly whisked with a fork)
65 grams / 1/2 cup / 2.3 ounces sifted all purpose flour
1 table spoon cocoa powder/or food coloring of choice
Butter/spray to grease baking sheet

Oven: 180C / 350F

Method:
Using a hand whisk or a stand mixer fitted with the paddle (low speed) and cream butter, sugar and vanilla to a paste. Keep stirring while you gradually add the egg whites. Continue to add the flour in small batches and stir to achieve a homogeneous and smooth batter/paste. Be careful to not overmix. Cover the bowl with plastic wrap and chill in the fridge for at least 30 minutes to firm up. (This batter will keep in the fridge for up to a week, take it out 30 minutes before you plan to use it).


Line a baking sheet with parchment paper or grease with either butter/spray and chill in the fridge for at least 15 minutes. This will help spread the batter more easily if using a stencil/cardboard template such as the butterfly. Press the stencil on the baking sheet and use an off sided spatula to spread batter. Leave some room in between your shapes. Mix a small part of the batter with the cocoa and a few drops of warm water until evenly colored. Use this colored batter in a paper piping bag and proceed to pipe decorations on the wings and body of the butterfly.


Bake butterflies in a preheated oven (180C/350F) for about 5-10 minutes or until the edges turn golden brown. Immediately release from baking sheet and proceed to shape/bend the cookies in the desired shape. These cookies have to be shaped when still warm, you might want to bake a small amount at a time or maybe put them in the oven to warm them up again. (Haven’t tried that). Or: place a baking sheet toward the front of the warm oven, leaving the door half open. The warmth will keep the cookies malleable.

If you don’t want to do stencil shapes, you might want to transfer the batter into a piping bag fitted with a small plain tip. Pipe the desired shapes and bake. Shape immediately after baking using for instance a rolling pin, a broom handle, cups, cones….

I served mine with passionfruit sorbet and greek style rasberry frozen yogurt. My shapes melted together on the baking sheet a bit, but once I was able to peel them off I could form them. They were quite tasty, with the flavor of sugar cookies but much lighter.

Monday, January 26, 2009

Whole Wheat Penne with Sausage and Lacinato Kale

Kale and sausage always seems like a warm hearty, winter combo for winter. This simple weeknight meal was super tasty.

Put a large pot of water on to boil. Remove 1-2 pounds sausage from their casings and heat over medium-high heat. Break up with a spatula as you cook. You can use whatever sausage you like - I used half garlic-herb and half hot Italian sausage.

Meanwhile, cook pasta so it is al dente and drain. Drizzle with olive oil to prevent from sticking until you are ready to add it to the sausage.

Prepare the lacinato kale by washing and removing the ribs. This kale is easily identified by it's bumpy skin.

Add some sliced onions and the kale to the sausage and saute until the kale is just wilted. Add the pasta and toss. Mix in freshly grated Parmesan and black pepper.

Serve in large bowls and top with freshly grated Parmesan and black pepper.